> ## Documentation Index
> Fetch the complete documentation index at: https://docs.sorcerer.trading/llms.txt
> Use this file to discover all available pages before exploring further.
# Strats
> Set up your autobuy and autosell with custom triggers and filters.
Create custom sleeping-on-your-bags setups for Sorcerer calls.
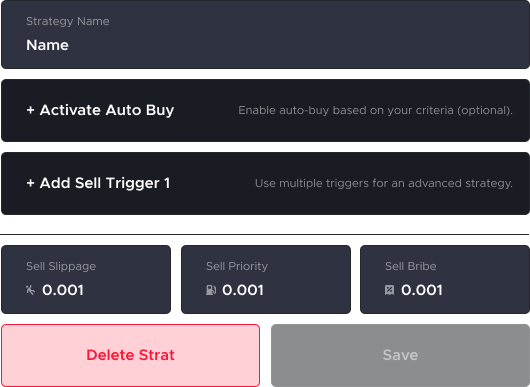 ## How to create custom strats
A short, step-by-step guide to building your own strategies.
On strats tab, tap `"Create New Strategy"` button;
Enter a strategy name;
Set basic parameters;
| **Buy/Sell Slippage** | Defines how much price movement you allow during a trade. | Higher slippage increases the chance your order fills, but at a worse price. |
| --------------------- | ---------------------------------------------------------------------------------- | ----------------------------------------------------------------------------------------------------------------- |
| **Buy/Sell Priority** | Controls how fast your transaction tries to go through. | Higher priority means faster confirmation but usually higher fees. |
| **Buy/Sell Bribe** | An optional extra fee paid to validators to push your transaction ahead of others. | Helps your order fill faster in congested markets. |
| **MEV Protection** | Reduces the risk of bots manipulating your trade before it confirms. | It helps prevent front-running, sandwich attacks, and other MEV tactics that can worsen your entry or exit price. |
Set buying parameters;
| **Min Market Cap** | The lowest market cap a token must have for your strategy to buy it. | Helps you avoid extremely small or risky tokens. |
| ------------------ | -------------------------------------------------------------------- | -------------------------------------------------------------------------- |
| **Max Market Cap** | The highest market cap a token can have for your strategy to buy it. | Useful for targeting early plays and avoiding large, slower-moving tokens. |
Set selling parameters;
| **Stop Loss** | Automatically sells your position if the price drops to a set percentage. | Helps limit your losses. |
| :-------------- | :------------------------------------------------------------------------ | :----------------------------------------------------- |
| **Take Profit** | Automatically sells your position when the price reaches a target gain. | Locks in profits without needing to monitor the chart. |
Setting multiple Take Profit levels lets you scale out gradually, locking in profits while still riding potential upside.
You can also activate **Trail Stop** for an advance strategy;
| **Activate At (%)** | **Price to Change (-%)** | **Amount to Sell (%)** |
| :--------------------------------------------------------------------------------------------------------------------------------- | :--------------------------------------------------------------------------------------------------------------------------------------------- | :------------------------------------------------------------------------------------------------------------------------ |
| The percentage gain where the trailing stop system turns on. After this level is reached, the strat starts watching for pullbacks. | How much the price must pull back from the top for the sell to trigger. This defines the pullback level that activates a partial or full exit. | How much of your position to sell when that pullback level is hit. Useful for scaling out in steps as the price retraces. |
You can set multiple Trail Stop levels to secure profits gradually as the price pulls back.
Trail Stop and Take Profit can be used together or on their own.
Tap `"Save"` button to save and set strategy, or `"Delete"` to start over.
## How to create custom strats
A short, step-by-step guide to building your own strategies.
On strats tab, tap `"Create New Strategy"` button;
Enter a strategy name;
Set basic parameters;
| **Buy/Sell Slippage** | Defines how much price movement you allow during a trade. | Higher slippage increases the chance your order fills, but at a worse price. |
| --------------------- | ---------------------------------------------------------------------------------- | ----------------------------------------------------------------------------------------------------------------- |
| **Buy/Sell Priority** | Controls how fast your transaction tries to go through. | Higher priority means faster confirmation but usually higher fees. |
| **Buy/Sell Bribe** | An optional extra fee paid to validators to push your transaction ahead of others. | Helps your order fill faster in congested markets. |
| **MEV Protection** | Reduces the risk of bots manipulating your trade before it confirms. | It helps prevent front-running, sandwich attacks, and other MEV tactics that can worsen your entry or exit price. |
Set buying parameters;
| **Min Market Cap** | The lowest market cap a token must have for your strategy to buy it. | Helps you avoid extremely small or risky tokens. |
| ------------------ | -------------------------------------------------------------------- | -------------------------------------------------------------------------- |
| **Max Market Cap** | The highest market cap a token can have for your strategy to buy it. | Useful for targeting early plays and avoiding large, slower-moving tokens. |
Set selling parameters;
| **Stop Loss** | Automatically sells your position if the price drops to a set percentage. | Helps limit your losses. |
| :-------------- | :------------------------------------------------------------------------ | :----------------------------------------------------- |
| **Take Profit** | Automatically sells your position when the price reaches a target gain. | Locks in profits without needing to monitor the chart. |
Setting multiple Take Profit levels lets you scale out gradually, locking in profits while still riding potential upside.
You can also activate **Trail Stop** for an advance strategy;
| **Activate At (%)** | **Price to Change (-%)** | **Amount to Sell (%)** |
| :--------------------------------------------------------------------------------------------------------------------------------- | :--------------------------------------------------------------------------------------------------------------------------------------------- | :------------------------------------------------------------------------------------------------------------------------ |
| The percentage gain where the trailing stop system turns on. After this level is reached, the strat starts watching for pullbacks. | How much the price must pull back from the top for the sell to trigger. This defines the pullback level that activates a partial or full exit. | How much of your position to sell when that pullback level is hit. Useful for scaling out in steps as the price retraces. |
You can set multiple Trail Stop levels to secure profits gradually as the price pulls back.
Trail Stop and Take Profit can be used together or on their own.
Tap `"Save"` button to save and set strategy, or `"Delete"` to start over.